

DIY Garden Hose Hanger for less than $20.
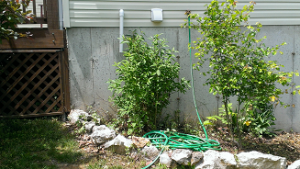
Over the years I’ve purchased multiple garden hose hangers, hose reels, hose carts, etc. They’re usually plastic, have lots of moving parts, and end up broken after a year or two. And these things aren’t cheap! You can expect to pay $30-$50 for a low end model. After my $40 hideaway cart broke beyond repair a couple of years ago, I was left with winding the hose up in a (sometimes) neat pile in a flower bed. This was inconvenient and not very attractive. Plus I had a couple close calls with spiders and other things that would hang out around the hose while it was laying on the ground.
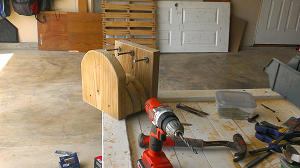
Materials and Tools needed
- Cost: $0-$20 – cost will vary depending on the purchase of lumber or hardware
- Tools: Saws – circular saw and jigsaw for power tools or handsaw and coping saw for hand tools (any combination will work too.
- You will also need a drill with a few bits along with screws and lag bolts.
- Time: 1.5 hours
Construction of the Garden Hose Hanger
So I set out to do something different. I wanted something that was simple and going to last for a while. THIS great video that Steve has over at Woodworking for Mere Mortals was inspiring. I liked his design, but I wanted to take a more simple approach to the build. I’m not too concerned about the hanger being precisely cut or completely perfect. It just needed to serve the basic purpose. I also wanted it to be as cheap to make as possible. So I gathered up some scrap pieces of pressure treated lumber and decided that a half circle design wouldn’t be hard to create.
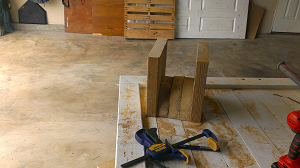
An 8 inch diameter flower pot was used to trace the curve onto 3 pieces of scrap 2″x8″ lumber. I then glued the 3 pieces together and screwed them together with 3″ wood screws from both directions.

A couple more pieces were used as the ends of the hanger, one as a mount for the wall and one to keep the hose from falling off the hanger.

I cut these pieces so that the bottom would be flush with the half round pieces and the height would be about 10 inches. Then I attached the two end pieces to the half round structure.
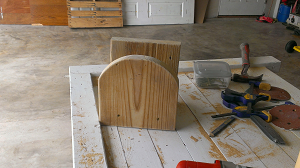
I rounded off the front end to give the garden hose hanger a more appealing look and to also allow the hose to wind around without getting caught on the 90 degree angles. At this point I also ran the orbital sander over everything to remove splinters, paint, etc.
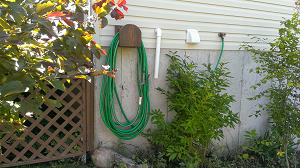
Three 5 inch lag bolts were added to secure the garden hose reel to the side of my house.
I finished off with a coat of deck stain and hung the garden hose reel near my hose spigot. Finally, I drilled pilot holes through my siding and into the floor joist above my foundation.

This garden hose hanger project is a very simple project and very cost effective. I only spent about an hour and a half for time and I had all of the materials on hand. Even if the material would need to be purchased the cost would be under $20.
Check out the video for more information
Great item. I am now going to make myself a Hose Hanger, Thanks.